Get Started with the SingleStore Snowpark App
On this page
Note
This is a Preview feature.
Introduction
SingleStore is a distributed SQL database with sub-second (and often < 100 or even < 10 ms) performance at scale across various challenging workloads, even when high concurrency is required.
Snowpark Container Services (SPCS) is a fully managed container offering designed to facilitate the deployment, management, and scaling of containerized applications within Snowflake.
SingleStore, in combination with Snowflake, provides a very capable foundation to power the next generation of intelligent apps and operational workloads.
You can get the SingleStore Native App for Snowflake, SINGLESTORE_, from the Snowflake Marketplace.
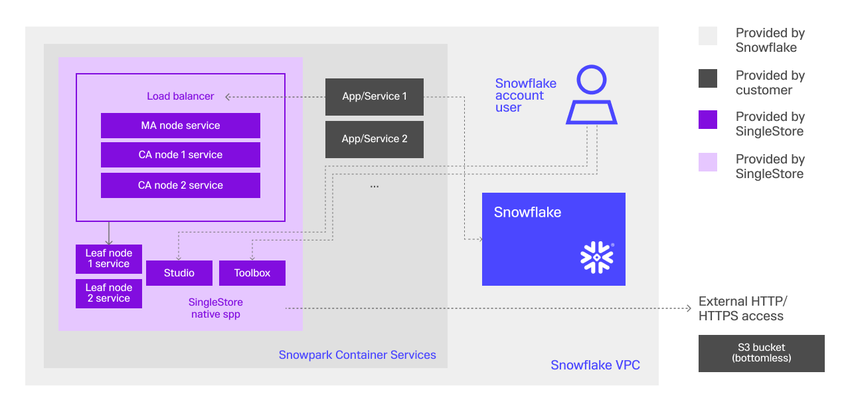
The following diagram is an overview of the full system architecture.

Prerequisites
Request Access
You must request access to the SingleStore app before you can use it.
-
Locate the SingleStore app in the Snowflake Marketplace.
Option 1: From the Snowflake Portal
-
Log into the Snowflake Portal.
-
In the search bar, search for SingleStore and click Marketplace to limit the search results to the Snowflake Marketplace.
Option 2: Not logged into the Snowflake Portal
-
Navigate to the Snowflake Marketplace and click Browse Listings.
-
In the search bar, search for SingleStore.
-
-
In the search results, click SingleStore’s Real-time Database for Intelligent Applications.
-
On the Real-time Database for Intelligent Applications page, click Request.
A form is displayed. Fill out the form with the requested information and click Request. -
After your request has been approved, the SingleStore app appears under Data Products > Apps.

-
Click Get to download the SingleStore app.
A confirmation dialog is displayed. Select the warehouse in which to install the SingleStore app and click Get.
Once installed, the SingleStore app appears in Data Products > Apps > Installed Apps.
-
Click on the SingleStore app.
Under Grant Account Privileges, review the requested privileges and click Grant.
Under Allow Connections, click Review.
Review the requested connections and click Connect. When done, click Activate.

Set Up
-
After the SingleStore app has been activated, click Launch app to launch it.

-
After a few moments, a Welcome to SingleStore page is displayed.
Click Start Dev Cluster to create a cluster.

-
On the Create Cluster page, create a cluster.
-
Provide a name for this cluster.
Choose a unique name that will help identify the type of workload connected with this cluster. -
Select a cluster size to fit the workload.
Larger clusters are available on request. Dev
Small
Master Aggregators
1
1
Child Aggregators
2
2
vCPUs per Aggregator
1
3
RAM per Aggregator (GB)
6
13
Storage per Aggregator (GB)
128
128
Leaf Nodes
2
2
vCPU per Leaf Node
1
6
RAM per Leaf Node (GB)
6
28
Storage per Leaf Node (GB)
128
512
-
Provide a password for the default database user.
Each cluster starts with a default database user named
root, which requires a password to connect to the cluster.
-
-
Click Create Cluster.
A progress bar is displayed as the cluster is created. It may take a few minutes to create the cluster. 
Network Configuration for Loading Data
The default networking rules only allow outbound HTTP traffic from a SingleStore cluster.
USE ROLE ACCOUNTADMIN;ALTER NETWORK RULE SINGLESTORE_DB_APP_APP_DATA.CONFIGURATION.SINGLESTORE_DB_APP_ALL_ACCESS_EAI_NETWORK_RULE SETVALUE_LIST=('<data-source-endpoint-or-IP-address>:<port>')
For example:
USE ROLE ACCOUNTADMIN;ALTER NETWORK RULE SINGLESTORE_DB_APP_APP_DATA.CONFIGURATION.SINGLESTORE_DB_APP_ALL_ACCESS_EAI_NETWORK_RULE SETVALUE_LIST=('192.168.1.2:443')
Loading Data into SingleStore
The SQL Editor, which is included with each cluster, performs like a worksheet, where users can add multiple SQL queries and then select which queries to run.
To access the SQL Editor, which is part of SingleStore Studio:
-
Launch the SingleStore app.
-
Select your cluster from the drop-down.
-
Click Go to SingleStore Studio under the Advanced dropdown.
-
Connect to the selected cluster by using the
rootuser and the password that you specified when the cluster was created.Note
If an error is displayed while launching SingleStore Studio, try opening the link (as shown in the address bar) in a private/incognito window.
You may be prompted to log into Snowflake.
Refer to SingleStore Studio SQL Editor for more information.
Unlimited Storage Databases
An unlimited storage database, also known as a "bottomless" database, is kept on remote object storage.
As unlimited storage databases are stored remotely, their size is not limited by the size of local cluster storage but by the available external object storage.
To create an unlimited storage database, use the {FOR | INTO | ON} <object_ option.FOR, INTO, and ON are synonyms and their functionality is identical.
Prior to creating an unlimited storage database, the enable_ engine variable must be set to ON, which is the default value.
The following example creates an unlimited storage database.
CREATE DATABASE bottomless_db ON S3 "bottomless_db_bucket/bottomless_db_folder"CONFIG '{"region":"us-east-1", "verify_ssl":false}'CREDENTIALS '{"aws_access_key_id":"your_access_key_id","aws_secret_access_key":"your_secret_access_key"}';
Refer to Local and Unlimited Database Storage Concepts for more information on using unlimited storage databases.
Amazon S3
SingleStore pipelines can extract objects from S3 buckets, optionally transform them, and insert them into a destination table.
The following is an example of how to load data from S3 via SingleStore pipeline.
-
Create a
SalesDatatable.CREATE TABLE `SalesData` (`Date` text CHARACTER SET utf8mb4 COLLATE utf8mb4_general_ci,`Store_ID` bigint(20) DEFAULT NULL,`ProductID` text CHARACTER SET utf8mb4 COLLATE utf8mb4_general_ci,`Product_Name` text CHARACTER SET utf8mb4 COLLATE utf8mb4_general_ci,`Product_Category` text CHARACTER SET utf8mb4 COLLATE utf8mb4_general_ci,`Quantity_Sold` bigint(20) DEFAULT NULL,`Price` float DEFAULT NULL,`Total_Sales` float DEFAULT NULL); -
Set a timeout before creating the
SalesDatapipeline.SingleStore recommends setting the global engine variable
pipelines_to 200000 to prevent timeouts and to provide an adequate amount of time to process the pipeline.extractor_ get_ offsets_ timeout_ ms This variable should be adjusted higher if the pipeline encounters timeouts. SET GLOBAL pipelines_extractor_get_offsets_timeout_ms = 200000; -
Define a
SalesDatapipeline to load data from S3 into SingleStore.CREATE PIPELINE SalesData_Pipeline ASLOAD DATA S3 's3://singlestoreloaddata/SalesData/*.csv'CONFIG '{ \"region\": \"ap-south-1\" }'INTO TABLE SalesDataFIELDS TERMINATED BY ','LINES TERMINATED BY '\n'IGNORE 1 lines; -
Start the pipeline.
START PIPELINE SalesData_Pipeline; -
Check for pipeline errors.
SELECT * FROM information_schema.PIPELINES_ERRORS WHERE pipeline_name = 'SalesData_Pipeline'; -
Confirm that this sample data was loaded.
SELECT * FROM SalesData;
Refer to Load Data from Amazon Web Services (AWS) S3 for more information.
Kafka
Apache Kafka is an open-source distributed event-streaming platform for high-performance data pipelines, analytics, data integration, and mission-critical applications.
Similar to S3, data from Kafka can be loaded into SingleStore via pipeline.
Note: The default networking rules only allow outbound HTTP traffic from a SingleStore cluster.
USE ROLE ACCOUNTADMIN;ALTER NETWORK RULE SINGLESTORE_DB_APP_APP_DATA.CONFIGURATION.SINGLESTORE_DB_APP_ALL_ACCESS_EAI_NETWORK_RULE SETVALUELTSTVALUE_LIST=('0.0.0.0:443','0.0.0.0:80*','pkc-rgm37.us-west-2.aws.confluent.cloud:9092','b0-pkc-rgm37.us-west-2.aws.confluent.cloud:9092','b1-pkc-rgm37.us-west-2.aws.confluent.cloud:9092','b2-pkc-rgm37.us-west-2.aws.confluent.cloud:9092','b3-pkc-rgm37.us-west-2.aws.confluent.cloud:9092','b4-pkc-rgm37.us-west-2.aws.confluent.cloud:9092','b5-pkc-rgm37.us-west-2.aws.confluent.cloud:9092'})
DROP PIPELINE IF EXISTS rideshare_kafka_trips;CREATE OR REPLACE PIPELINE rideshare_kafka_trips ASLOAD DATA KAFKA 'pkc-rgm37.us-west-2.aws.confluent.cloud:9092/ridesharing-sim-trips'CONFIG '{"sasl.username": "username","sasl.mechanism": "PLAIN","security.protocol": "SASL_SSL","ssl.ca.location": "/etc/pki/ca-trust/extracted/pem/tls-ca-bundle.pem"}'CREDENTIALS '{"sasl.password": "password"}'DISABLE OUT_OF_ORDER OPTIMIZATIONREPLACE INTO TABLE tripsFORMAT JSON(id <- id,rider_id <- rider_id,driver_id <- driver_id,status <- status,@request_time <- request_time,@accept_time <- accept_time,@pickup_time <- pickup_time,@dropoff_time <- dropoff_time,fare <- fare,distance <- distance,pickup_lat <- pickup_lat,pickup_long <- pickup_long,dropoff_lat <- dropoff_lat,dropoff_long <- dropoff_long,city <- city)SET request_time = STR_TO_DATE(@request_time, '%Y-%m-%dT%H:%i:%s.%f'),accept_time = STR_TO_DATE(@accept_time, '%Y-%m-%dT%H:%i:%s.%f'),pickup_time = STR_TO_DATE(@pickup_time, '%Y-%m-%dT%H:%i:%s.%f'),dropoff_time = STR_TO_DATE(@dropoff_time, '%Y-%m-%dT%H:%i:%s.%f');START PIPELINE rideshare_kafka_trips;-- Create a riders table and kafka pipeline that consumes the ridesharing-sim-riders topic and upserts data.DROP TABLE IF EXISTS riders;CREATE TABLE riders (id VARCHAR(255) NOT NULL,first_name VARCHAR(255),last_name VARCHAR(255),email VARCHAR(255),phone_number VARCHAR(255),date_of_birth DATETIME(6),created_at DATETIME(6),location_city VARCHAR(255),location_lat DOUBLE,location_long DOUBLE,status VARCHAR(20),PRIMARY KEY (id),SORT KEY (status, location_city));DROP PIPELINE IF EXISTS rideshare_kafka_riders;CREATE OR REPLACE PIPELINE rideshare_kafka_riders ASLOAD DATA KAFKA 'pkc-rgm37.us-west-2.aws.confluent.cloud:9092/ridesharing-sim-riders'CONFIG '{"sasl.username": "username","sasl.mechanism": "PLAIN","security.protocol": "SASL_SSL","ssl.ca.location": "/etc/pki/ca-trust/extracted/pem/tls-ca-bundle.pem"}'CREDENTIALS '{"sasl.password": "password"}'DISABLE OUT_OF_ORDER OPTIMIZATIONREPLACE INTO TABLE ridersFORMAT JSON(id <- id,first_name <- first_name,last_name <- last_name,email <- email,phone_number <- phone_number,@date_of_birth <- date_of_birth,@created_at <- created_at,location_city <- location_city,location_lat <- location_lat,location_long <- location_long,status <- status)SET date_of_birth = STR_TO_DATE(@date_of_birth, '%Y-%m-%dT%H:%i:%s.%f'),created_at = STR_TO_DATE(@created_at, '%Y-%m-%dT%H:%i:%s.%f');START PIPELINE rideshare_kafka_riders;
Refer to Load Data from Kafka for more information.
Iceberg
Apache Iceberg is an open table format that simplifies data management by enabling seamless and scalable data storage across different platforms without the need for complex ETL processes.
Refer to Snowflake’s Apache Iceberg™ tables, Iceberg Ingest, and Get More From Your Data with SingleStore + Snowflake Integration video for more information.
Ridesharing Demo
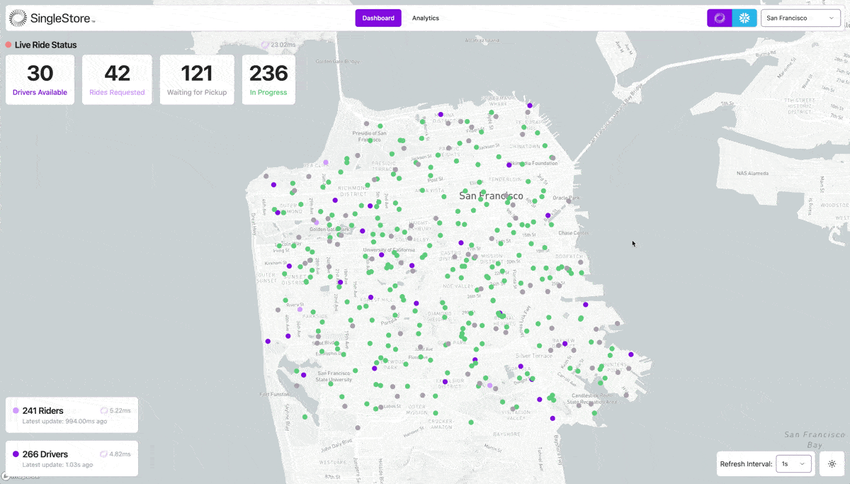
To help demonstrate what the combination of Snowflake data, the SingleStore app, and Iceberg tables can deliver, SingleStore has created a real-time ridesharing simulation.

The instructions in the GitHub repository show how to set up SingleStore and the ridesharing simulation in SPCS, ingest Snowflake data through Iceberg, and connect existing Kafka streams to feed-in real-time information, all without sacrificing the ownership of the Snowflake data.
To build the ridesharing simulation in your own cluster, refer to Ridesharing Simulation in Snowpark.
Manage the Cluster
SingleStore App Interface
|
Function |
Description |
|
View the Cluster Status |
The selected cluster's status is displayed in the SingleStore app and in the main dashboard when SingleStore Studio first opens. |
|
Upgrade SingleStore |
Upgrades the cluster to the latest version of SingleStore. |
|
Upgrade Toolbox |
Upgrades the cluster to the latest version of Toolbox. |
|
Suspend a Cluster |
Suspends a cluster. When a cluster is suspended, the cluster name and connection endpoint are preserved, but the cluster does not process queries or consume credits. |
|
Resume a Cluster |
Resumes a suspended cluster. |
|
Repair a Cluster |
If the cluster is in an unhealthy state, all stopped services will be resumed and the Toolbox service will be restarted to repair the cluster. |
|
Delete a Cluster |
Deletes a cluster. Deleting a cluster stops all running queries and permanently removes the cluster and its data. |
|
Toolbox Management Console |
Provides Toolbox-level access to the cluster via a command line.
Note: As this feature can render a cluster unusable, use it with caution. Note: If an error is displayed while opening the Toolbox Management Console, try opening the link (as shown in the address bar) in a private/incognito window. |
|
Get Service Logs |
This obtains the service logs using the |
|
Get Cluster Report |
This runs the sdb-report collect command on the cluster. |
Snowflake Worksheet
You may also interact with and manage a SingleStore cluster directly from a SQL worksheet in Snowflake using the following stored procedures.
|
Description |
Stored Procedure |
|
Obtain the TCP host for connecting to the cluster |
|
|
Retrieve the SingleStore Studio and TTYD endpoints |
|
|
Run SQL commands directly against a cluster |
|
|
List all services within the cluster |
|
|
Upgrade SingleStore for all nodes in a cluster |
|
|
Upgrade the Toolbox service for a cluster |
|
|
Suspend a cluster |
|
|
Resume a cluster |
|
|
Permanently delete a cluster This action is irreversible and requires confirmation |
|
Obtain Support
To obtain support with the SingleStore app, either email spcs@singlestore.
Last modified: May 29, 2025

